
It is not a very difficult procedure to make a concrete patio, particularly in case it is the first attempt. When it is done correctly, such as the job of ensuring the thickness, support and drying out, your patio will last years.
In this guide, all the steps are addressed simply, and thus, you can determine whether or not you want to perform it as a DIY project or pay someone professional. We will discuss prices, time, and suggestions in order to select it. Whether you’re in Denver, CO, or somewhere else, you’ll know what you need for a great patio.
Should You Build Your Patio or Hire a Pro?
You will be able to save money, and it will take a lot of work to build your patio. With supplies and tools, it may only cost you between $3 to 8 dollars per square foot when doing it yourself. Then, be careful of unexpected expenses, such as using your money to secure concrete delivery service, equipment hire (such as a mixer or smoothing equipment), or purchasing too much extra material than is required. If you mess up, like pouring it unevenly or drying it wrong, fixing it can cost a lot.
Hiring a pro costs $6 to $14 per square foot. They take care of permits, levelling, and making it look nice so your patio stays strong and doesn’t crack or sink.
DIY Pros and Cons
- Pros: Saves cash, you pick the style, feels great to do it yourself.
- Cons: It takes lots of time and hard work, and mistakes can wreck the patio.
Hiring a Pro Pros and Cons
- Pros: Done quick, looks super nice, lasts a long time.
- Cons: Costs more, you don’t control everything.
Want an easy patio? Get a free quote from All American Flatwork in Denver, CO.
How Much Does a Concrete Patio Cost?
The cost of a concrete patio is based on size style, and location. It is very expensive and ranges between $6 to $14 dollars per square foot in most places. But those in Denver, CO, tend to be about $8 to $12 dollars per square foot higher since it is more costly to have workers and supplies there. Factors such as inaccessible areas, licenses or additional yard work will make it more expensive.
Costs by Patio Style
- Plain brushed finish: $6–$10 per square foot.
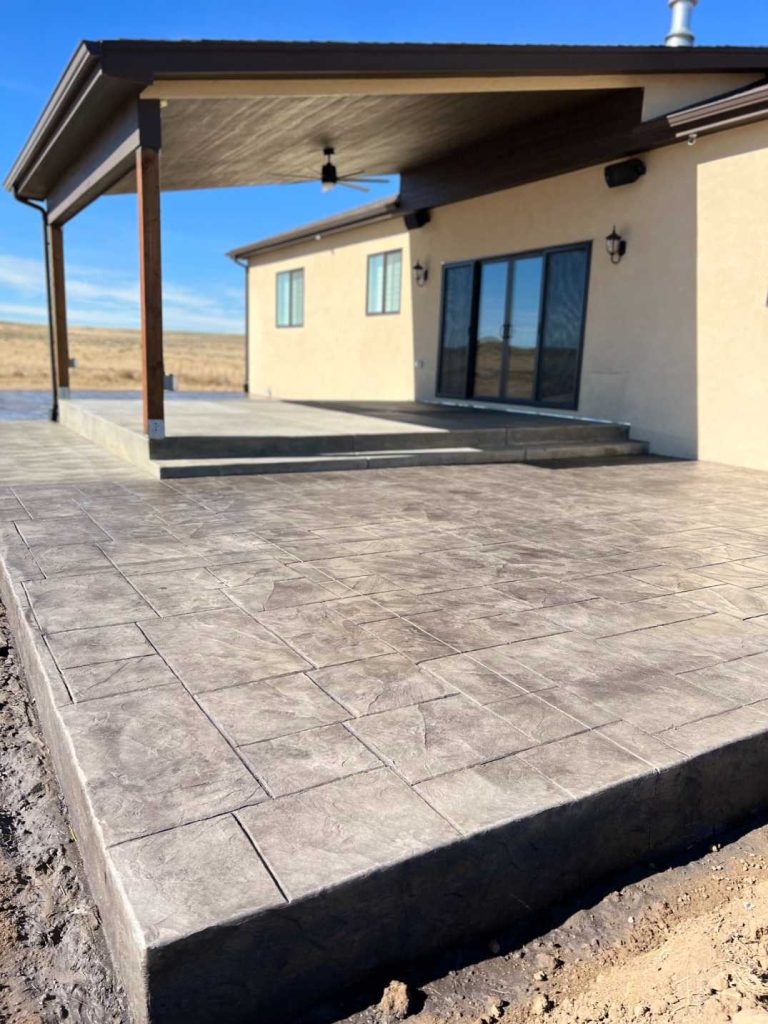
- Stamped concrete: $8–$14 per square foot. See cool stamped concrete designs.
- Coloured concrete: $10–$14 per square foot.
DIY Cost Example (100 sq ft Patio)
- Concrete: $200–$400.
- Gravel for base: $50–$100.
- Rebar or wire mesh: $50–$100.
- Tool rentals (mixer, smoothers): $100–$200.
- Total: $400–$800.
Professional Cost (100 sq ft Patio)
- Total: $600–$1,400, including workers and supplies.
Get a free quote before starting to see if doing it yourself or hiring a pro is better for your wallet. For awesome concrete work in Denver, check out our patio services.
How to Build a Concrete Patio: Easy Steps
Here’s a simple guide to making your concrete patio, step by step.
Step 1: Plan and Mark the Spot
Calculate how large your patio is (as in a 10-foot square = 100 square feet). Barp up the location by using stakes, string and spray paint. Having the slightest slope to the ground (1/8 inch to the foot) allows the water to flow off. See whether any place requires a permit and your city has the rules about it. Good planning will ensure your patio is flat and does not allow water to stay on it.
Step 2: Dig and Get the Ground Ready
Excavate the hole between 8 and 10 inches deep: between 4 inches to place concrete and 4 to 6 inches to provide a gravel foundation. The patios generally require a pent-thick amount of slab. When you will be putting heavy loads on it like a hot tub, then make it 5 to 6 inches thick. A shovel can be used to dig up small areas, or a small digger can be hired to do large areas.
Put a base for 4 to 6 inches of gravel or crushed stone. Tamp or compact it with a hand tamper or rented compactor. A well-founded base prevents the sinking and cracking of a patio. Failure to do this encounters serious troubles later.
Step 3: Set Up the Frame
Use strong 2×4 wood boards or metal forms to shape the patio. Hold them in place with stakes every 2 to 3 feet. Check that the forms are level and straight with a level and measuring tape. Leave space for expansion joints (every 8 to 12 feet) and control joints to stop cracks. Straight forms make nice, clean edges.
Step 4: Add Rebar or Wire Mesh
Do you need rebar for a concrete patio? Yes, for most patios, rebar or wire mesh makes the slab stronger and helps stop cracks. Rebar is tougher but costs more. Wire mesh is cheaper but not as good for heavy patios.
Rebar vs. Mesh
- Rebar: Use #3 or #4 rebar (3/8 or 1/2 inch thick) placed 18 to 24 inches apart in a grid. Costs $0.50–$1 per foot.
- Wire Mesh: Costs less ($0.15–$0.30 per square foot) but not great for heavy stuff.
Place rebar in a grid and connect pieces with wire. Hold it in the centre of the slab by means of small supports (rebar chairs). Rebar comes in handy to make the patio tough in zones such as Denver, whose ground freezes and thaws.
Step 5: Mix and Pour the Concrete
To cover large patios, use ready-mix concrete (1 cubic yard is sufficient to cover approximately an 80-square-foot area at 4 inches thickness). In small patios, you simply prepare concrete mix in a wheelbarrow, or you hire a mixer (concrete bags: 80 pounds produce approximately 0.6 cubic feet). A strong slab needs the use of 4:1 sand-to-cement.
I’ll use a rake or shovel, then distribute the concrete in the remaining opening. In small patios, do work on sections so as not to have seams (which are referred to as cold joints). Work quickly since it takes one to two hours before concrete can harden. This step is much more complicated with the help of a helper.
Step 6: Level and Smooth It
Screed the concrete by drawing straight 2×4 or metal forms across the forms. Swing it back and forth in order to clear off excess concrete. Then, smooth up the surface with a bull float. To have a non-slippery patio, brush it using a broom to achieve a rough effect. Brush the sharp edges with a trowel to have a clean look. This procedure is 2-4 hours, depending on the size of the patio.
Step 7: Add Final Touches
Use an edging tool to round the edges for a neat look. Cut control joints every 8 to 12 feet with a grooving tool to control cracks. For a fancy patio, try stamping patterns or adding colour. A concrete sealer protects the surface and makes stamped concrete pop. A brushed finish or light texture keeps it safe to walk on.
Step 8: Let the Patio Dry
Your patio is strong with no cracks because of drying (usually referred to as curing). Cover it with plastic sheeting or wet burlap and maintain it damp (not wet) for 7 days. Mist lightly when in hot or dry weather. After 24 up to 48 hours, you can walk on it, and 7-14 days later, use heavy items such as furniture on it. This may spoil the surface, or the patio may lose strength when rushed.
How Thick Should a Concrete Patio Be?
The required slab thickness of most patios will be 4 inches. Make it 5 to 6 inches thick, especially when you are putting heavy items such as a hot tub or large grill. The thicker slabs are more durable and tolerate cracks, especially during cold days in Denver winters. Confirm the local regulations because certain areas will require a particular thickness.
How Deep Should the Base Be?
Place the solid slab on a base of crushed stone or packed gravel 4 to 6 inches thick so that the slab is lifted up and helps the water drain. A 6-inch base is more suitable for wet ground or areas with rainfall. Tightly fill the base coat to prevent the patio from sinking and thereby cracking or having uneven spots.
How Long Does It Take to Build a Patio?
Building a patio yourself takes 1 to 3 days, depending on size and how good you are with tools. Digging, prepping the base, and setting forms can take a whole day. Pouring and smoothing take 4 to 8 hours. Pros can finish in 1 to 2 days. The patio needs 7 to 14 days to dry before heavy use. Prep takes longer than most people think, so give yourself extra time.
Tips to Pour a Strong Bad Concrete Patio That’ll Last Decades
- Stir up concrete correctly: When it is too dry, it is difficult to lay; too wet, and the result is a weak patio. The consistency should be thick, something like peanut butter.
- To prevent the water pooling, slope patio: a 1/8-inch-per-foot slope prevents pooling.
- Apply rebar or mesh: It will prevent cracks.
- Add control joints: Place them 8 to 12 feet apart to manage cracks.
- Hire pros for big jobs: For large or fancy patios, reach out to All American Flatwork to avoid mistakes.
DIY or Hire a Pro?
DIY is good for small patios (100–200 square feet) if you’re handy. It saves money but takes time and care. Bigger patios or ones with special designs (like stamping or colouring) are better done by pros for a smooth, strong result. Fixing concrete mistakes is pricey and tough.
Get a free quote from All American Flatwork, a trusted concrete contractor serving the Denver Metro area, to find what works best.